External Fuel Filter Modification R1100/850
by Rob Lentini
After I bought my ’87 K75S I soon found it interesting (and strange) that the fuel filter was installed inside the fuel tank! Most fuel-injected cars that I’ve worked on have external filters, so I wondered about the theory and reasoning for designing the filter location this way, but it wasn’t a big deal on that K. One can quite easily access the filter by removing the fuel filler cap assembly and then reach into the tank with tools and a hand to remove and replace the filter per BMW service intervals. Mind you, one still has to run the tank mostly dry and then contend with modern fuel carcinogens on his or her skin (use surgical gloves!). But, filter replacement isn’t a big deal on K bikes.
Type 259 Boxers (Oilheads) are a completely different story, however. Sure, the filter is (for some reason) still mounted in the tank like the K bikes, but the big difference is you can’t see the filter from the filler opening regardless of whether the filler assembly is removed or not. You can’t even reach the dang thing with your hands. Besides, you don’t even want to attempt to blindly remove and replace the filter this way or your hand or tools would likely damage the fuel level float rheostat assembly ($$$)!
On my RS, with close similarities to RTs, GSs, Rs, Cs and I suspect the S, the fuel filter is part of one main assembly that holds the fuel pump, fuel level float/rheostat and filter all together as one unit. This unit is, in turn, mounted to the right/inside flat surface of the fuel tank using a circular flange fastened by six Allen head machine screws. A large “O” ring seals the interface to prevent leaks. To replace the fuel filter, one must remove the fuel tank and them remove the above assembly to gain access to the fuel filter. Even careful removal of the assembly from the tank risks damage to the fragile fuel level float mechanism since the darn thing is a tight squeeze in the fuel tank and needs some “maneuvering” to get it free and clear.
BMW recommends that the fuel filter be replaced every 24,000 miles, or 12,000 miles if fuel is of poor quality. I can vouch from experience that only one bad load of water-contaminated fuel is enough to clog these filters and bring the motor (and your ride!) to a halt. I therefore decided early on with my K to replace this filter more often. I wanted to do the same on my R1100RS but soon discovered the process was a hassle. Was there a better way?
There is a better way! I’ve found a sanitary and safe method of installing either the OEM BMW filter or a less expensive aftermarket variety conveniently outside of the tank where it may be easily serviced in minutes. Here’s how:
DISCLAIMER:
This is a non-stock, non-BMW approved method of placing the fuel filter outside of the tank. Some others and I believe this to be safe if correctly accomplished by a knowledgeable person using proper parts, procedures and tools. DO THIS AT YOUR OWN RISK.
MATERIALS REQUIRED:
1. 6 ft of 5/16 (7.9 – 8.00mm) fuel injection hose. It is VERY important to ONLY purchase fuel injection-rated hose since up to 42 psi exists in the fuel system! It’s expensive (~$4.00 per ft) but don’t EVEN consider regular hose.
2. Original (expensive!) BMW filter or steel-bodied Deutsch FF401 or FF424 filter (both Deutsch’s are the same except for unneeded hose adapters/clamps with the FF424) available at Auto Zone (~$2.00). The FF401/424 are for various and sundry small and big car gas and diesel engines ranging up to MOPAR 440 cubic inch V8s. DON’T use the Fram G2 nylon-encased equivalent. The high 42 psi fuel pressure could burst a non-metallic fuel filter case!
3. 8 fuel injection hose clamps, size 12.5 or 13mm (or inch equivalent). These are the typical BMW style “squeeze together” clamps, NOT worm gear types. Again, these are also available at BMW or auto parts stores. You only really need 6 of these since two on your bike are reusable, but 8 if you want all new hardware.
4. Size 28 “Adel” aircraft cable clamp to belay the fuel filter to the transmission. This clamp fits the Deutsch filter. A larger diameter clamp will be required for the BMW filter since it’s slightly wider. Clamps are available at some specialized hardware stores, electrical shops, or alternatively the filter could be plastic cable-tied (with rubber cushioning). I recommend a clamp.
5. New sealing “O” ring for the fuel pump assembly.
6. Longer brake line clamp screw, 4 x 22mm with ~3mm spacer
PROCEDURE (in accordance with tank and fuel filter removal/replacement steps of the BMW or Haynes manual, plus those below):
PHOTOS: filter1, filter2, filter3, filter4, filter5
1. Drain (siphon dry) and remove the fuel tank. Don’t forget to disconnect the two electrical connectors! Observe and label which hose you removed from the tank to each plastic fuel distribution line that goes between the cylinders (through the engine from right to left). You’ll also need to disconnect the two small rubber vent lines at their unions above the right throttle body.
2. Remove the fuel pump assembly from the tank (six Allen screws).
3. Observe the fuel filter mounted on the removed fuel pump assembly. Loosen the four crimped hose clamps and remove the filter and two short fuel hoses. One of the fuel hoses has a 180-degree bend, for reference.
4. Replace the filter, two hoses and four crimped clamps with ONE 10″ length of new fuel injection hose and two new fuel injection clamps. Loop the new hose 180 degrees to bypass the entire fuel filter setup you just removed. Be sure to align the hose and clamps for neatness and non-interference with the fuel level float.
5. Reinstall the fuel pump assembly (with new “O” ring) onto the tank. Be careful to NOT over torque the six Allen head screws, since the nut plates in the tank are known to sometimes strip out.
6. Observe the two fuel injection hoses leaving the outside of the tank from the pump assembly. The UPPER hose is the “return” hose and the LOWER is the “supply” or pressure hose.
7. Replace the UPPER fuel injection hose with the same length new hose. Use another new clamp at the fuel pump end.
8. Replace the LOWER fuel injection hose with all of your remaining new hose. It will be cut twice later. Again, use a new clamp at the fuel pump end.
9. Install the tank. Don’t forget the electrical connectors and vent lines. Smile! You will NEVER have to remove it again for filter replacement!
10. Install the UPPER “return” hose, with new clamp, to the UPPER plastic distribution line.
11. Run the entire length of the LOWER “supply” hose along and under the UPPER “return” hose. Continue to route it towards the rear, above the clamp holding the steel brake lines, then inside and out to the right BETWEEN the two brake lines just forward of the rear subframe mounting boss casting on the transmission.
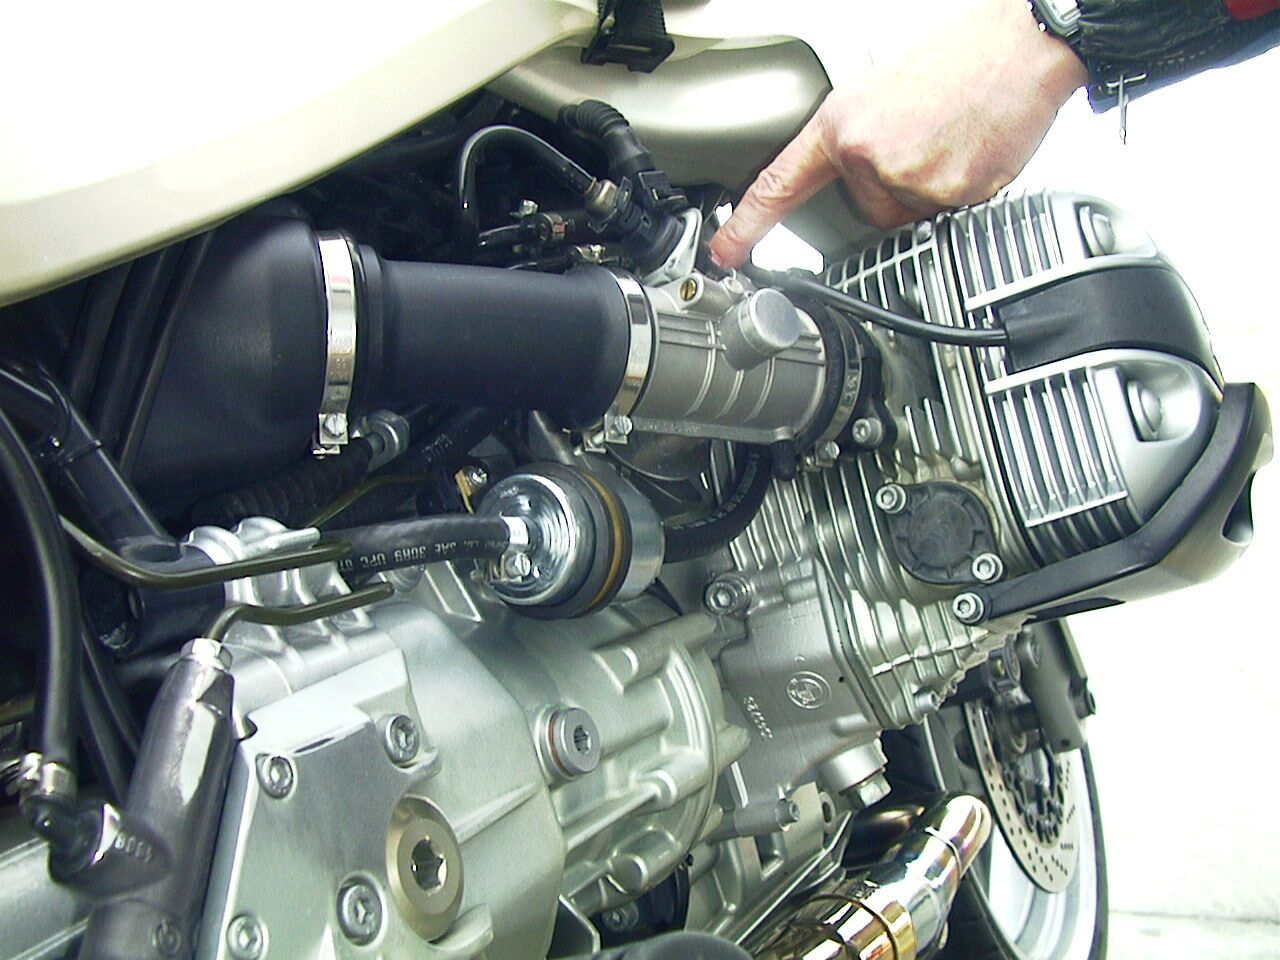
12. Mount your new filter using the cable clamp, the 4mm diameter longer screw and the spacer in place of the screw where the brake lines are clamped to the transmission casting below the right throttle body. The filter fuel direction arrow should be pointing forward. The center fuel filter circumvential flange on the Deutsch should be forward of the clamp.
13. Carefully gauge the correct length of fuel hose needed to make a neat 180-degree turn and connection to the input (rear end) of the fuel filter. Cut and install the “supply” hose to the rear of the filter using another new clamp. Position the open ends of the clamp down before tightening.
14. Now install the remaining length of fuel hose to the outlet (forward end) of the filter, again using a new clamp. Feed the new hose forward, up and inside of the inlet tract of the right throttle body towards the input of the LOWER “supply” plastic distribution line.
15. NOW THIS IS IMPORTANT! Cut the remaining hose to allow a smooth generous arc that contacts the cylinder finning and does NOT interfere with throttle operation. Start longer than you think and trim a little at a time to allow for a smooth arc and NO throttle mechanism interference on the right throttle body. Now install your last new clamp at the LOWER “supply” plastic distribution line.
16. RECHECK ALL WORK, SANITIZE THE LAYOUT, RECHECK THROTTLE OPERATION, DOUBLE CHECK ARROW DIRECTION ON THE FILTER!
17. If all looks OK, start the engine and check for leaks.
18. Test ride the motorcycle. After the ride, AGAIN check for throttle interference. If you made the forward loop long enough the hose will generously clear the throttle mechanism.
Well, that’s it! You can now change out the filter in minutes and with no hassle. You will never have to go into your tank again. The aftermarket Deutsch filter is cheap, works fine, and encourages replacement every major service at 12,000 miles—a good practice. The Deutsch also works fine in Ks.
ONE FINAL NOTE:
I personally thank noted wrench Joe Katz for this “loop” installation method, for which I give him full credit. I had originally installed a much smaller filter along the “supply” line without a loop above the right throttle body. This seemed to work until I observed that the Fram 3606 filter I was using at the time would inhibit fuel flow at wide open throttle, dropping fuel pressure and causing fuel starvation initially on the right cylinder—NOT good! Curiously, the similarly sized Deutsch FF330 I previously had installed didn’t cause this. Anyway, I wanted to use the larger OEM size filter but couldn’t see the obvious “Katz” solution. Thanks, Joe!
As always, questions are welcome. Happy Wrenching!
Best,
Rob Lentini
Pingback:R1150RT External Fuel Filter Modification – The Internet BMW Riders